Scope
Steps to compose an Xpression.
Instructions
-
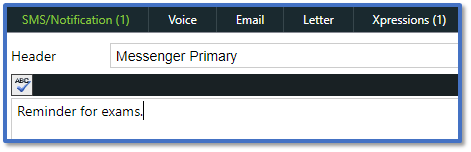
In SMS/Notification, enter the message that will appear as a push notification on the recipient’s phone. You cannot send an Xpression without filling in this tab.
-
Go to Xpressions.
-
To add an attachment, click Choose File > select the file > Open.

-
Any attachments you add will show directly beneath this.

-
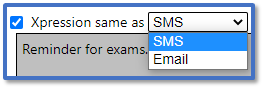
Tick Xpression same as SMS/Email to automatically use a copy of the message from one of those tabs or untick it to enter a new message in the text editor.
-
Use the tools available in the Basic Editor to format your email e.g., insert hyperlinks, insert images, add bullet lists, change font type etc. Read our guide for further information: Messenger: Basic and Advanced Editor.

-
You can switch from the standard Design view to the HTML view if you would prefer creating the Xpression using HTML code.

-
Continue to Step 11 in Messenger: Send Advanced Messages.