Scope
Steps to import contacts with a spreadsheet.
Instructions
-
Go to Tools > Contacts > Upload Data.
-
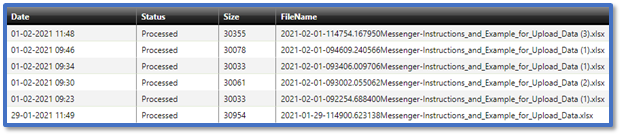
This page shows a list of previous uploads with the following data:
-
-
Date: The date and time of the upload.
-
Status: Whether the upload was Processed, Uploaded, or Failed.
-
Size: The number of kilobytes (KB) the file used.
-
FileName: The name of the file that was uploaded (including the unique identifier applied by the system).
-
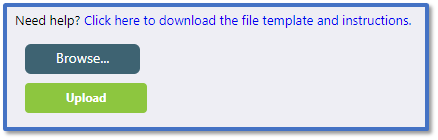
Go to Click here to download the file template and instructions.
-
This will download a spreadsheet containing three sheets - Contacts, Relationships, and Instructions – and default examples of students, parents, and staff.
-
The Contacts sheet is where you add the data for the students, parents, and/or staff you are adding into Messenger. It contains the following columns:

-
-
ID: This is a unique ID for the contact. This can be any number format you wish, and we recommend including letters as well as numbers. It is mandatory.
-
Surname: This is the last name of the contact. It is mandatory.
-
Forename: This is the first name of the contact. It is mandatory.
-
Mobile-Phone: This is the mobile phone number of the contact. This will be used when sending messages via SMS to Mobile/Voice to Mobile.
-
Home-Phone: This is the home telephone number of the contact. This will be used when sending messages via Voice to Home.
-
Work-Email: This is work email address of the contact. This will be used when sending messages via Email.
-
Home-Email: This is the personal email address of the contact. This will be used when sending messages via Email.
-
Language: This is the home language of the contact.
-
ContactType: This is whether the contact is Student, Parent or Staff. It is mandatory.
-
Gender: This is the gender of the contact. Use M for Male or F for Female.
-
Group-Reg: This is the registration group of the contact. If you enter a registration group that already exists in Messenger then the contact will be added to it when uploaded, otherwise it will create a new one.
-
Group-Year: This is the year group of the contact. If you enter a year group that already exists in Messenger then the contact will be added to it when uploaded, otherwise it will create a new one.
-
Fill in the columns for each contact you need to add into Messenger.


-
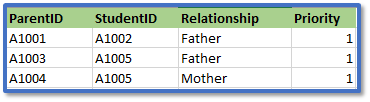
The Relationships sheet is where you link together students with the parental contact related to them. It contains the following columns:
-
-
ParentID: This is the ID of a parent from the first sheet.
-
StudentID: This is the ID of the student related to that parent from the first sheet.
-
Relationship: This is the nature of the relationship type between the parent and the student e.g., Mother or Father.
-
Priority: This is the priority number of the parent in relation to the student e.g., the Primary Parental Contact will be 1.
-
Fill in the columns with each relationship in a separate row. A parent can have a relationship with more than one student and vice versa.
-
Save the file.
-
In Upload Data, click Browse > select the Excel file > Upload.
-
The new file will appear in the list with the status Uploaded.
-
These uploaded contacts will now be available for sending messages.
-
To update or delete these contacts, read our guide for further information: Messenger: Manage Contacts. However, the Group-Year and Group-Reg can only be updated with a new upload: Messenger: Update Year and Reg Groups for Uploaded Contacts.