Scope
Steps to add up to five custom tokens to Messenger.
Instructions
For Messenger’s default tokens, read our guide: Messenger: Tokens (Merge Fields).
-
Go to Tools > Contacts > Custom Merge Fields.
-
Read the compliance terms and tick I agree.

-
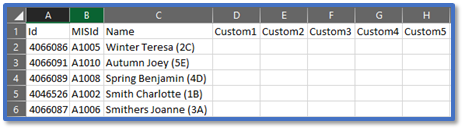
Click Download to download and open a CSV file with all your imported students. It contains the following columns:
-
-
Id: This is a unique ID generated by Messenger.
-
MISId: This is a unique ID provided by your MIS. It is not necessarily the same as their admission number or student ID.
-
Name: This is the student’s full name and registration group.
-
Custom1-5: These columns are used for the custom merge field data.
-
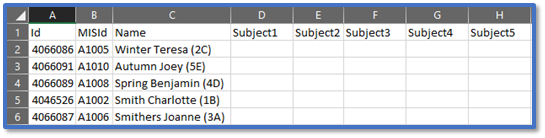
Change the Custom heading(s) to the name of your merge field(s).
-
-
Note: You can only enter alphanumeric characters in the column headings i.e., you cannot include any spaces, punctuation, or symbols. These are also case sensitive.

-
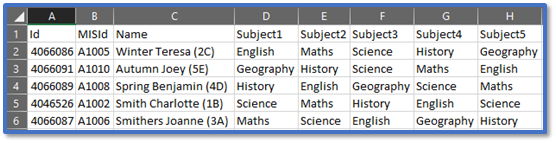
In each Custom column you are using, enter the merge field’s data value for each student you need.
-
Save as a CSV (Comma delimited) file.
-
In Custom Merge Fields, click Browse or Choose file > select the CSV file > Upload.

-
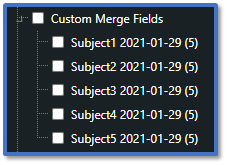
It will state that the file uploaded successfully. This page will show the user that last uploaded a file, the date and time it was uploaded, and the categories that were uploaded.

-
Go to Advanced Messaging and there will be a new group called Custom Merge Fields with a subgroup for each category:
-
Tick the group or subgroup(s) to select the students from the upload rather than searching for them individually. Read our guide for further information: Messenger: Send Advanced Messages.
-
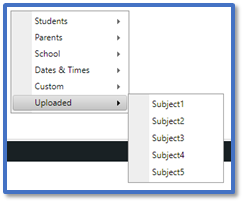
If you are sending a SMS, right-click inside the text editor to open a token menu where the custom merge fields are listed in Uploaded. Read our guide for further information: Messenger: Creating SMS.
-
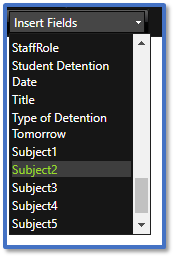
If you are sending an email, go to Insert Fields and scroll down to the bottom to see your custom merge fields. Read our guide for further information: Messenger: Creating Emails.
-
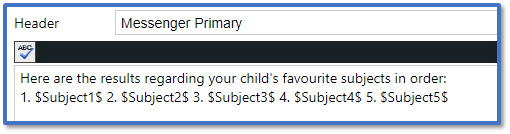
Click on the token(s) to insert it into the message or manually enter it into the text edit.
-
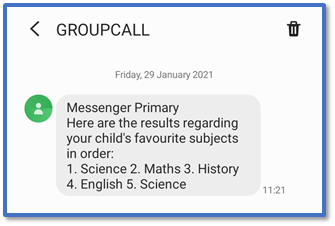
When you send the message, the contact will receive the individualised data that you originally uploaded for the student.
-
To replace the uploaded data with new merge fields, simply follow the instructions above with another spreadsheet to overwrite the previous data. Or, if you want to remove this uploaded data altogether, download the CSV file from Custom Merge Fields again and upload it with the Custom columns left blank.